Stripped Down Motor
A coil of wire becomes an electromagnet when current passes through it. The electromagnet interacts with a permanent magnet, causing the coil to spin. Voila! You have created an electric motor.
1. Arrange your materials and confirm that you have all needed items.
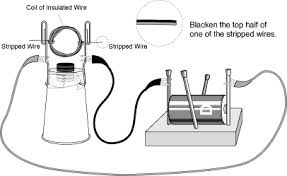
2. Strip the insulation off the ends of the wire projecting from the coil, using the sandpaper to remove the enamel. (See video 2.)
3. Wind the copper wire into a coil about 1 inch (2.5 cm) in diameter. Make four or five loops. Wrap the ends of the wire around the coil a couple of times on opposite sides to hold the coil together. Leave 2 inches (5 cm) projecting from each side of the coil, and cut off any extra. (See video 3.)
4. Unfold one end of each paper clip, bend the end at a right angle.(See video 4.)
5. Tape paper clips to opposite sides of the cup, with their unfolded ends down. (See video 5)
6. Turn the cup upside down and place two magnets on top in the center. Attach three more magnets inside the cup, directly beneath the original two magnets. This will create a stronger magnetic field as well as hold the top magnets in place. (See video 6.)
7. Place batteries in a battery holder. Use the clip leads to connect the battery or power supply to the paper clips, connecting one terminal of the battery to one paper clip and the other terminal to the other paper clip. (See video 7.)
8. Rest the ends of the coil in the cradles formed by the paper clips. Adjust the height of the paper clips so that when the coil spins, it clears the magnets by about l/l6 inch (1.5 mm). Adjust the coil and the clips until the coil stays balanced and centered while spinning freely on the clips. Good balance is important in getting the motor to operate well. (See video 8.)
9. Give the coil a spin to start it turning. If it doesn't keep spinning on its own see the view video 9 and the Troubleshooting document below.
10. Check out the working motor in video 10.
